
Originally posted November 23, 2020
I have been making pie since I was a young girl. I remember when my mom introduced me to recipes from Martha Stewart, specifically pie crust. I felt very confident in that recipe for many years, especially with my cooking background. So when my daughter was put on a gluten-free diet (and eventually the whole family), making a tasty pie and easy gluten-free crust was a high priority.
At the end of the day, I focused on the technique and just swapped out the flour. Over the years, I have changed my basic flour blend (see this post on Amy’s gluten-free flour blend). These days, the availability of good flour blends is much more prevalent. One thing to note and why I use my own blend is the amount of gum that is needed for pie crust. It’s slightly higher than muffins but less than bread. Some times the ratio in commercial gf flour blends may not be right for pie crust but I don’t want that to stop you. Try a blend like King Arthur’s GF Measure for Measure, GF Jules, or Cup for Cup.
I’m going to give you all of the info from my cookbook, The Warm Kitchen; I really want you to be successful! Let’s start with a high level overview.
Steps to Make Gluten-Free Pie Crust
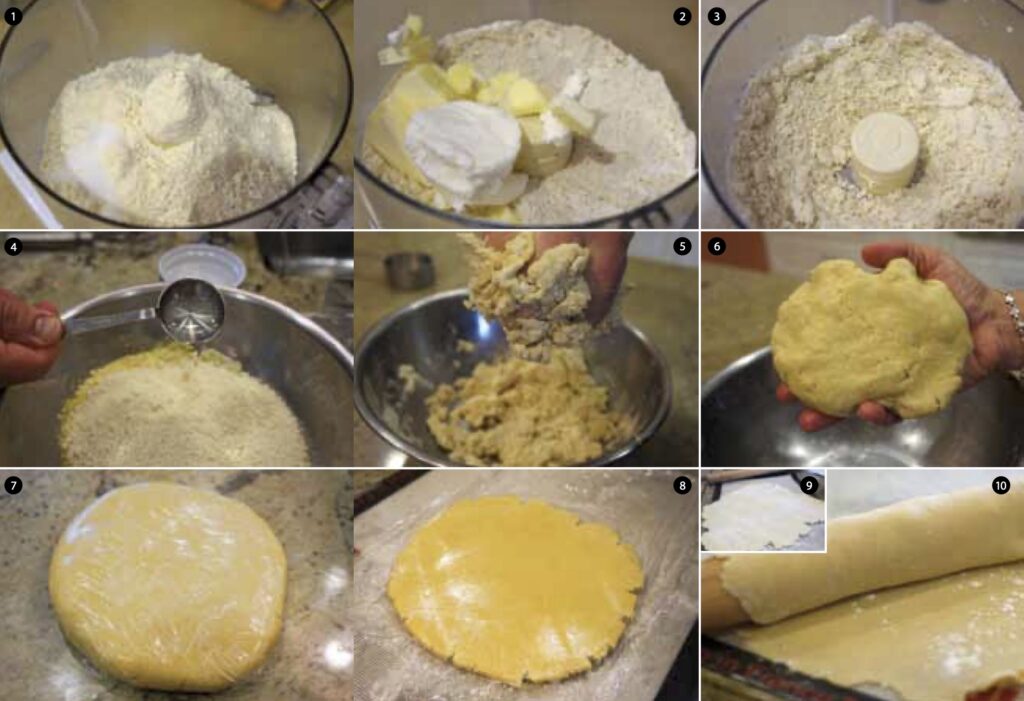
- Place dry ingredients in food processor and mix.
- Place cold butter and/or shortening in the processor.
- Process until butter is incorporated and the mixture looks like grated cheese. Alternatively, “cut” the butter with the flour in a bowl with two knives or a pastry blender.
- Transfer to mixing bowl and add liquid ingredients. Start by adding 1 tablespoon of water.
- Mix dough with your hands. Add more water until it comes together.
- Shape into a disc.
- Crust should be smooth or else it will crack. Wrap in plastic and place in the fridge for at least 30 minutes.
- Roll between plastic wrap. You can also use a special silicone rolling mat which the dough will not stick to.
- You can also use Amy’s Gluten-Free Flour Blend or rice flour to roll out the dough.
- Carefully roll the dough onto the rolling pin to transfer it to the pie dish. Alternately, if you roll between two pieces of plastic, you can remove the top piece of plastic then flip the crust into the pie dish. Remove the top piece of plastic and proceed.
Chef Tips: Pie Crust
Now that you have an overview of the process, let’s focus on the details. Here are my best tips to help you make a great gluten-free pie crust:
- Cut the butter into 1⁄2″ cubes to make it easier to distribute before processing. Since shortening is usually softer, cut this into smaller pieces after it is cold. I usually place by butter and shortening in the freezer for 5 minutes before I process it with the flour.
- When mixing the pie crust, if it is very sticky, add more of the flour blend so that it is tacky. If it is breaking, add a few drops of cold water. Developing the right texture of pie crust takes practice.
- Shape the dough based on the recipe (either 1 or 2 discs) and wrap in plastic. Place in fridge for at least 30 minutes or up to 4 days. This helps the butter or shortening to firm back up and makes your pie crust flakey.
- Remove the crust from the fridge about 15 minutes before you are ready to use it. If you only need one piece, reserve the other piece for later use. The pie crust can be frozen.
- To roll, place the disc between two sheets of plastic. If the dough seems sticky, use a little potato starch or my flour blend on the dough so it doesn’t stick to the plastic.
- You can also roll on the counter although I rarely do this. Place about 2 teaspoons of the starch or flour blend on the counter. Place dough on top. Place a piece of plastic on top of the dough and roll. Flip dough over once to make sure both sides are not too sticky. Use more starch if necessary.
- If it’s hard to roll out, leave it on the counter for another 5 minutes. If the dough is still hard to roll, it did not have enough water. You can try patting the dough with water to fix it.
- Roll out to 1/8″ thick. If using 2 sheets of plastic, remove top piece of plastic. Flip dough into the baking dish or pan and remove other piece of plastic.
- If you rolled on the counter, use the rolling pin to roll the dough back onto the pin. This makes it easier to unroll into the pie dish or pan. Use more starch if the dough is sticky.
- If the dough breaks, press together to mend. Use water if necessary.
Uses for Extra Dough
If you find yourself with extra dough, here are some ideas of what you can do with it.
Pastry leaves: Roll out some of the extra dough. Using mini leaf cookie cutters (or a paring knife), cut, and place on a baking sheet lined with parchment paper or a silicone baking mat. Use a small knife to make lines on the leaf. Brush with an egg wash (1 egg mixed with 1 teaspoon milk or water, lightly beaten). Bake at 400°F until golden, maybe 7-10 minutes. Once cool, place on top of pie, for example, a pumpkin pie.
Pastry twists: Roll out dough. Cut into strips 5″ to 6” long. Twist and place on a baking sheet lined with parchment paper or a silicone baking mat. Sprinkle with white sugar and cinnamon. Bake at 400°F until golden, maybe 7-10 minutes or until golden and fragrant.
Gluten-Free Pie Crust recipe
Makes 2 crusts (top and a bottom) for pie, quiche or any crust you might need
- 4 tablespoons unsalted butter, cut into ½″ cubes
- 4 tablespoons vegetable shortening Note: you can use all butter, or for dairy-free, all shortening
- 1 and ¾ cups Amy’s Gluten-Free flour blend or a rice-tapioca-potato starch based blend, plus extra if necessary
- ½ teaspoon sea or kosher salt
- ¾ teaspoon xanthan gum (omit if your blend has gum)
- 1 large egg, lightly beaten
- 2 teaspoons white or apple cider vinegar
- 1 to 2 tablespoons ice water
- Potato starch or Amy’s Gluten- Free Flour Blend for rolling
Note: If making a pie crust for something sweet, add 3 tablespoons sugar to the flour, salt, and gum mixture.
- Place butter and shortening in a small bowl in the freezer to get extra cold. It only needs to be in there for 5 minutes. By the time you are done measuring the dry ingredients, it should be cold enough.
- Add flour, xanthan gum, and salt to a food processor (add sugar if making a sweet crust). Pulse a few times to mix. Alternatively, mix this in a medium bowl.
- Add very cold shortening and butter to the processor. Pulse for 10 to 20 seconds or until shortening and butter are chopped. The mixture should look like grated Parmesan cheese. If you don’t have a food processor, use a pastry blender to blend the butter and shortening with the flour mixture, or use two knifes to “cut” the shortening and butter into the flour mixture.
- Mix the egg and vinegar in a medium bowl. Add the butter and flour mixture and 1 tablespoon of the ice water. Reserve the last tablespoon if needed.
- Using your hands, mix the dough. Wait to add more water until the dough has begun to take shape. Shape according to the recipe (either 1 or 2 discs). Dough should stick together well and should not have cracks. If it does have cracks or is dry, add a few drops of water until it doesn’t have cracks and isn’t dry. Wrap in plastic and place in the fridge for at least 30 minutes. Prepare your pie filling, e.g. pumpkin, apple, or quiche.
- Remove pie crust discs 5 minutes prior to using. Roll out to 1⁄8″ (refer to Steps and Tips above) and place dough into pie dish. Cut excess with kitchen scissors or a knife. Reserve extra to make pretty leaves or pastry twists (see above).
- Crimp edges and place back in the fridge for 20 minutes to harden the dough. This prevents the dough from shrinking too much when baked in the hot oven.
- Proceed with your pie recipe.
Leave a Reply